Calling the Microsoft Dynamics 365 Web API with Postman

A new Mule 4.x project I am working on will be getting its Customer relationship management data in Odata format from Microsoft Dynamics using the Dynamics 365 Web API. Seeing as test data was made available, I wanted to call the API and see what the response would be. For these types of calls I generally use Postman.

However, after filling in the Request URL and the Authorization, I kept getting a ‘401 Unauthorized’ response.

Postman returns a 401 Unauthorized When trying to call the Dynamics 365 Web API

After some searching I eventually contacted our CRM partner for support, where we reproduced the error despite following official documentation. We managed to find out that the API was working – security settings were fine – just not when using Postman.

Giving it some thought later in the day, I went and tried a more basic approach to requesting the Oauth2 token – calling the /oauth2/token directly.

Retrieving the Oauth2 token

If you’ve never used Oauth2, don’t worry. Getting an access token is fairly straightforward.

In Postman, open a new request.

Change the Method to [POST], and use the following link for the request URL: https://login.microsoftonline.com/<tenant_id>/oauth2/token.
Replace <tenant_id> with your own organization uuid.

Next, create the following parameters in the body using ‘x-www-form-urlencoded’:
‘grant_type’ : ‘client_credentials’
‘client_id’ : use your client id here
‘client_secret’ : use your client secret here
resource’ : use your resource, will probably look like org.crm.dynamics.com (do not add /api/data/v9.x).

You can set these parameters and URL details in an environment, but there is a chance variables aren’t being passed correctly and Postman (or more accurately Dynamics 365) might throw an error – Make sure you fill in both the ‘Initial Value’ and the ‘Current Value’ as this seems to be required. The documentation I linked above will have a page on Postman environments in case you want to try.

The ‘tenant_id’ is used to request and receive a token related to your specific organization, and you validate your identity with the ‘client_id’ and ‘client_secret’. The token is only valid for calling the specific ‘resource’, so if you wanted to use this newly acquired token to call a different resource within your tenant, it wouldn’t work.

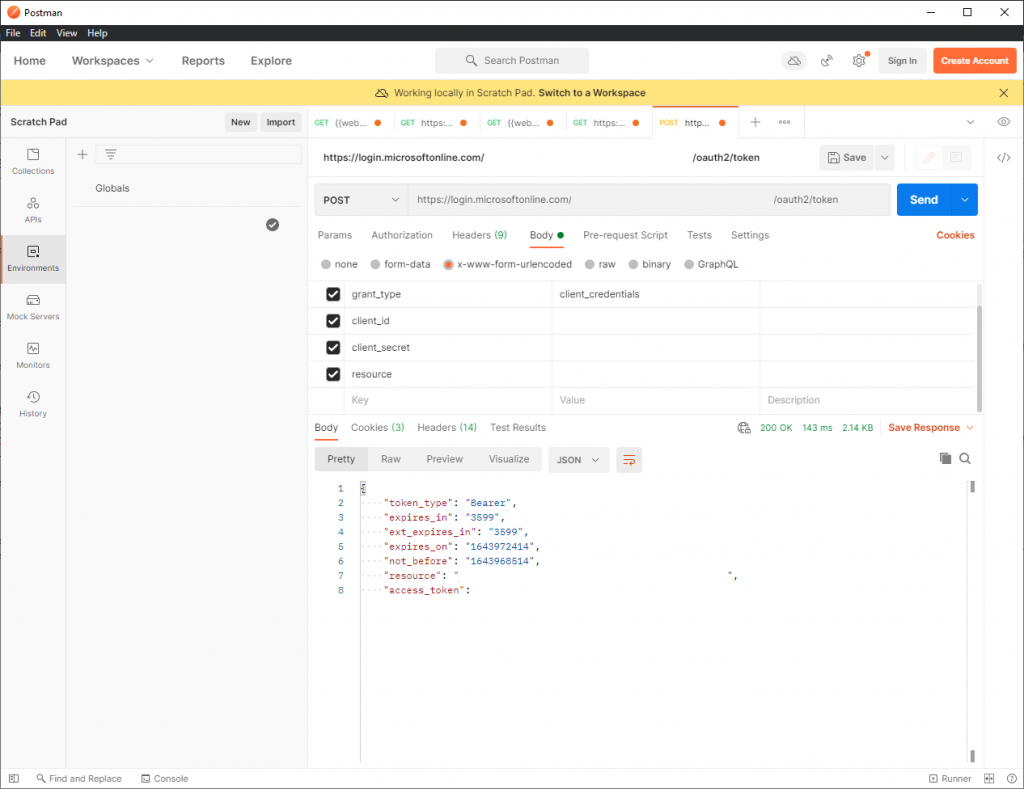
As you can see you will get a standard Bearer token in the response. Copy the ‘access_token’. We will use it in the next step.

Calling the resource

Now that we have an Oauth2 token, we can call the resource like in the original attempt and get the CRM data.

In Postman, open a new request.
Set the method to [GET], and fill in the ‘resource’ as request URL. Append it with /api/data/v9.x – depending on which version you are using, common used are 9.0 or 9.1, then click on the Authorization tab. Select Oauth2 as type.

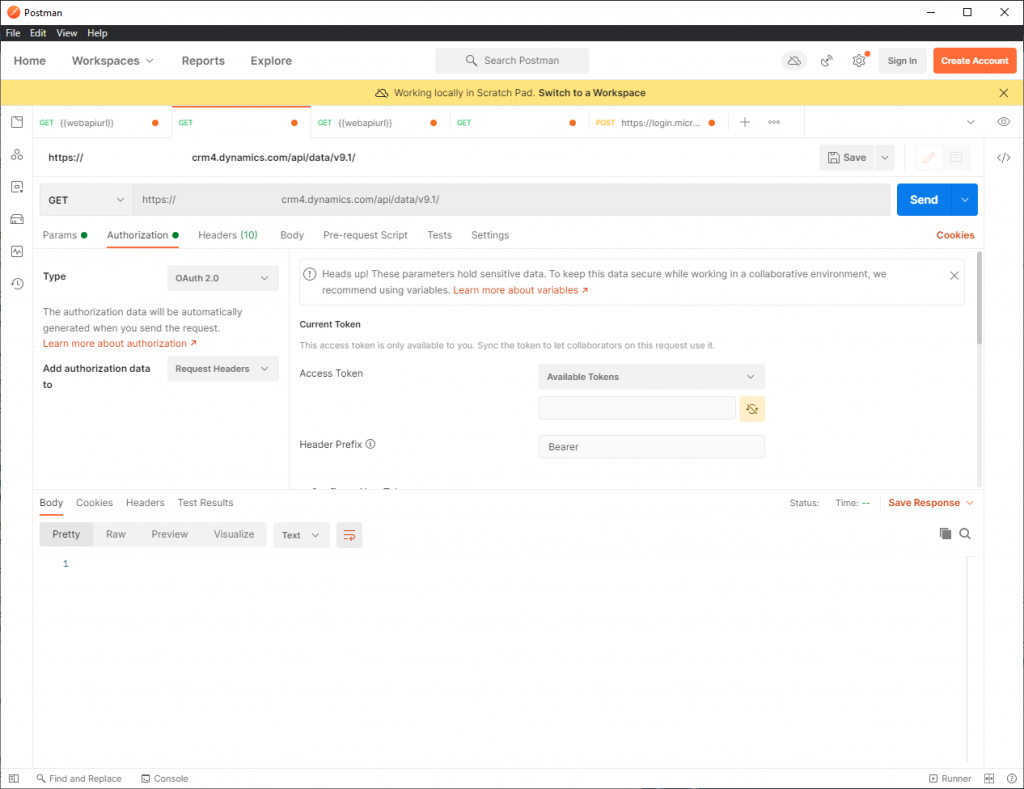
Paste your copied ‘access_token’ into the blank area in order to add it to the request. You don’t have to change any of the other settings.

That’s it! from now on you can connect with the Dynamics 365 Web API and GET the information stored in the resource.

Solution for the original issue

Updating my Postman application to the latest version gave me more options to configure the token, adding the resource into the advanced options solved the issue I had at the beginning and will allow you to get the token through regular configurations in the authorization tab.

Issues with importing from Git in Anypoint Studio

I am currently working on a Mule 4.3 project for a client together with a co-worker of mine in Anypoint Studio 7.7. When I wanted to import his work into my new and clean environment, I went through the usual steps – Go to ‘File’ at the top, and select ‘Import’.

Then, in the Import window, select ‘Git’ > ‘Projects from Git’.

Clicking ‘Next’ allows you to select from ‘Existing local repository’ or to ‘Clone URI’. Since we use Gitlab, I clicked the option to clone the URI and filled in the information and authentication, then kept tag and branch selection as default and clicked ‘next‘ again.

When you’re done with that you’re presented with the Wizard for project import. If you keep the default ‘Import using New Project wizard‘, it will open the wizard and let you choose what kind of project you want. Since we are working on a Mule 4 Project, I’ll select ‘Mule Project’ and click ‘Next’.

Decide on a name and select your runtime. Also make sure you set the Project location to your preferred directory.

There are two issues here depending on what you do now, if you click ‘Next’ the Wizard will turn your Mule project into a Java project. If you click ‘Finish’, you will get the following error.

This is the first issue I ran in to – but as there was a second one I’ll address them separately.

Anypoint Studio fails to ‘Import using New Project wizard‘ and gives a ‘Connecting Git team provider failed‘ error

The first solution here is to use ‘Import as general project’ instead of ‘Import using the New Project wizard’. That would at least stop giving you the Git error.

What you can also do is go to the ‘Git perspective’ which can be found at ‘Window’ > ‘Perspective’ > ‘Open Perspective’, and import it from there as Anypoint Studio did manage to pull the project from the Git location – but then your entire project will look like it contains empty packages instead of regular source folders.

Which brings me to the second issue.

Anypoint Studio sees Mule projects as Java projects when importing from Git

To solve this problem, we need to open up the .project file that is inside our project, and add a <buildCommand> as well as a <nature> node for Mule.

Below you can find a generic .project.xml snippet where you just need to change the name of the project.

<?xml version="1.0" encoding="UTF-8"?>
<projectDescription>
	<name>PROJECT NAME</name>
	<comment></comment>
	<projects>
	</projects>
	<buildSpec>
		<buildCommand>
			<name>org.eclipse.jdt.core.javabuilder</name>
			<arguments>
			</arguments>
		</buildCommand>
		<buildCommand>
			<name>org.mule.tooling.core.muleStudioBuilder</name>
			<arguments>
			</arguments>
		</buildCommand>
	</buildSpec>
	<natures>
		<nature>org.mule.tooling.core.muleStudioNature</nature>
		<nature>org.eclipse.jdt.core.javanature</nature>
	</natures>
</projectDescription>

If you now save your project, commit, delete your project and then re-import from your local Git repository, it should look like a normal project again.

Solution to both issues

There is a simple solution that would solve both these issues right from the start, but it takes a little bit of setup and it’s not as obvious as you would initially expect.

Since the ‘Import’ option exists, and it offers importing from Git, logically that would be the correct approach to go with right? So far so good, importing- by itself – does not cause any problems. The issues appear when you start to turn it into a workable project.

Simply put – once you have imported the project into your local Git repository (by using Anypoint Studio or Sourcetree or whatever you want), instead of using the ‘Import using the New Project wizard’, go back to ‘File’ and click ‘Open Project from File System’ and then select your local directory. When you finish this process your project should now appear without any issue as a normal Mule project.